For the installation of Turboveg3 on your computer follow the simple instructions provided by the setup program.
If you wish to install Turboveg3 in a different folder than the one proposed by the setup program, keep in mind that create and write access is required for the folders '<installation folder>\Db' and '<installation folder>\Maps'. The 'Db' folder will host the databases (and backups of the databases) you will be working with. After the installation is completed you can move the 'Db', and a few other subfolders to other locations, but at the same time the new folder names must be registered in the registry (see list of key below).
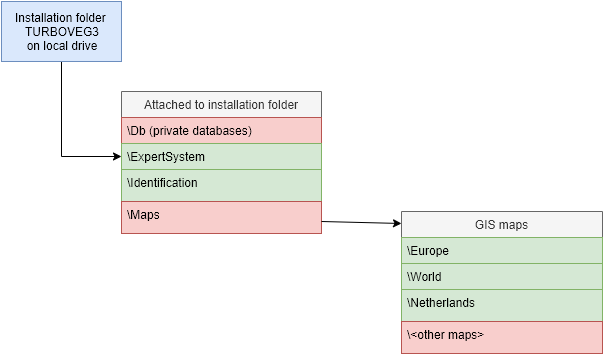
In the diagram below the folder structure after installation on a local drive is shown. The green colour marks folders that only require read access, folders marked with red colour require read, write and create access.
Registry
Many of the settings in Turboveg3 (position and size of forms, registration, file locations, etc.) are stored in the registry in the section HKEY_CURRENT_USER\Software\Alterra\Turboveg3.
Below a list of registry entries for folders that may be changed after the installations has been taken place. By default all files are installed in various sub-folders under a single installation folder.
Description |
Registry |
Suggested folders |
Registration email address |
HKEY_CURRENT_USER\Software\Alterra\Turboveg3\Registration\EmailAddress |
|
Registration key |
HKEY_CURRENT_USER\Software\Alterra\Turboveg3\Registration\Key |
|
Local database folder |
HKEY_CURRENT_USER\Software\Alterra\Turboveg3\General\LocalDatabaseFolder |
<Private folder>\Turboveg3\\Db |
Shared database folder |
HKEY_CURRENT_USER\Software\Alterra\Turboveg3\General\SharedDatabaseFolder |
<Turboveg3 installation folder>\Db |
Backup database folder |
HKEY_CURRENT_USER\Software\Alterra\Turboveg3\General\BackupoDatabaseFolder |
<One drive>\Turboveg3\Backups |
Proxy.ini folder |
HKEY_CURRENT_USER\Software\Alterra\Turboveg3\General\ProxyFolder |
{CSIDL_COMMON_APPDATA}\Turboveg3 |
Identification folder |
HKEY_CURRENT_USER\Software\Alterra\Turboveg3\General\IdentificationFolder |
{CSIDL_COMMON_APPDATA}\Turboveg3\Identification |
Maps folder |
HKEY_CURRENT_USER\Software\Alterra\Turboveg3\General\MapsFolder |
{CSIDL_COMMON_APPDATA}\Turboveg3\Maps |
Selectios database folder |
HKEY_CURRENT_USER\Software\Alterra\Turboveg3\General\DbSelectionsFolder |
{CSIDL_APPDATA}\Turboveg3\Db |
Selection criteria folder |
HKEY_CURRENT_USER\Software\Alterra\Turboveg3\General\SelectionCriteriaFolder |
{CSIDL_APPDATA}\Turboveg3\SelectionCriteria |
NDVH folder |
HKEY_CURRENT_USER\Software\Alterra\Turboveg3\General\NDVHFolder |
{CSIDL_APPDATA}\Turboveg3\NDVH |
Hunt duplicates folder |
HKEY_CURRENT_USER\Software\Alterra\Turboveg3\General\HuntDuplicatesFolder |
{CSIDL_APPDATA}\Turboveg3\HuntDuplicates |
Webservice
In a few cases a webservice is used by Turboveg to retrieve data from the cloud. The domain name of the service is https://www.synbiosys.alterra.nl.
First time use
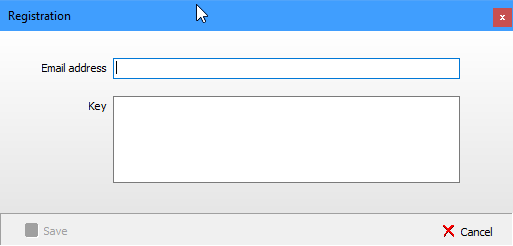
Running Turboveg3 for the first time a message will appear informing you that a trial version is in use. The trial version does not allow to export more the 10 selected plot observations. A registration key will be acquired after the software has been purchased. To register Turboveg go to HELP, Registration.
Registration is also required to get access to some of the big databases like EVA and sPlot, but only if you are a core member of the projects related to these databases. You can check via the download manager (see Download database) if such a database is at your disposal.
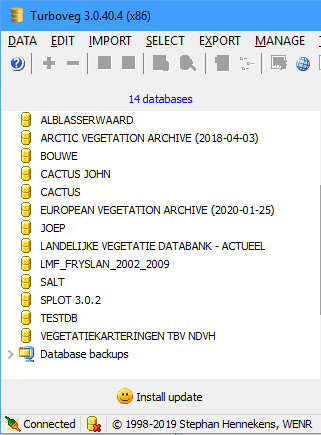
For updates there is an automatic notification. Whenever an update of the program is available a button Install update appears below the index on the left site of the application window. In case this option is not desired the 'Install update' button can be suppressed by using the start-up parameter nocheckforupdate, although a notification about a new version will always appear in the right upper corner of the application window.
Installation in a local area network (LAN)
WARNING!
Although Turboveg3 is designed to share databases among multiple users the experiences so far are showing the opposite. When two or more users are accessing the same database located on a network drive it may happen that Turboveg freezes. So far experiences within various organisations are different. In some cases querying a database by multiple users runs without problems, whereas in other cases Turboveg freezes. Therefore it is a matter of testing whether it possible to access a database simultaneously or not.
At the moment multiple users editing a database at the same time is absolutely not recommended.
To be on the safe side it is recommended to:
•Create a general database in which closed projects are stored;
•Create a personal database for each user, preferable in a private domain.
In case access errors occur when launching Turboveg a start-up parameter noscanforprotection should be applied.
Turboveg3 can also be installed on a local network drive on a single location to enable sharing the program and databases among multiple users within an organization. In such case a log-in to a shared (and protected) database is required (if the database is marked as such during creation; see (Un)protect database), unless the user logs in as 'guest'. There are three user profiles (guest, editor, manager). The administrator can assign a profile to each user, where a user may have more than one profile assigned. Besides the shared database(s), each user can also have full access to private databases located in his or her personal working space (see Manage database folders). Private databases do not require a log in.
Note that the database file admin.sqlite and users.sqlite should also be moved to the folder on the network drive where the shared database(s) are stored. Admin.sqlite and users.sqlite are encrypted databases, the latter holds the user information.
The very first time Turboveg3 is launched, prior to a log-in of any other user, the administrator should log into the system by selecting MANAGE, Users in the menu. An administrator password can be set and used to log in for later sessions. For managing users see Manage users.
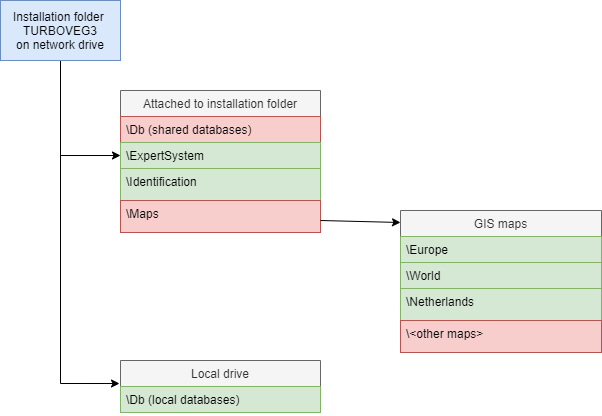
In the diagram below, the folder structure is shown after installation on a network drive. The green colour marks folders that requires read access, folders marked with red colour require read, write and create access.