Importing a vegetation table is a rather comfortable process in Turboveg3. Spreadsheet files (in Excel or CSV format) with more than 10,000 columns and many rows can be processed in a short time. Unlike in Turboveg2, it is not required to transpose and to store the header data in a separate sheet or file; Turboveg3 takes care of that. The only restricting is that from the first plot on (column 3 in the sample table below), columns that do not hold a plot observation need to be removed. This can easily be done in Turboveg once the table is loaded.
It is recommended to import a vegetation table in an empty dataset (see New dataset). A dataset can easily be deleted if the import is not as expected. Note that a dataset can easily be merged with another dataset after a successful import (see Merge datasets).
Note that the same table should not be imported more than once; Turboveg does not automatically check for duplicates.
Also note that only one cover scale per Excel sheet is supported.

Species tab
After the vegetation table is loaded, three actions have to be undertaken on the Species tab.
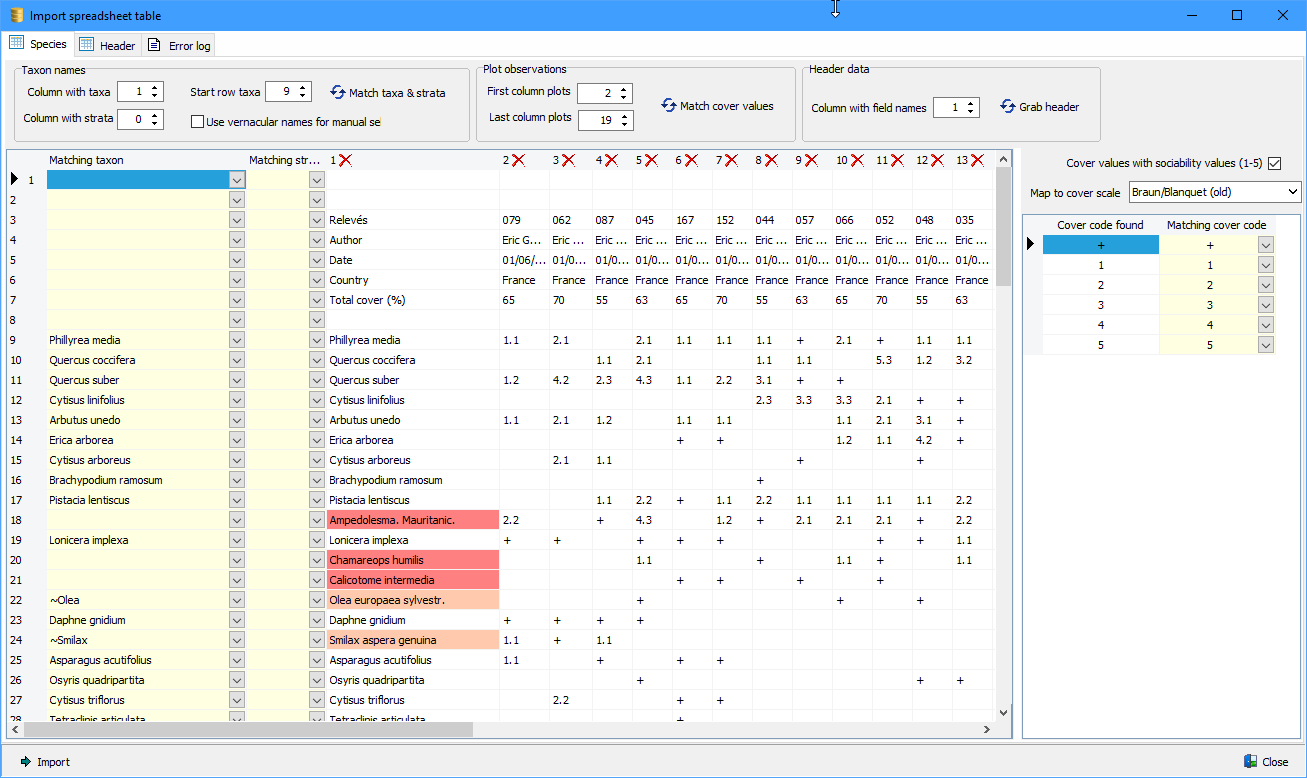
1.Match taxa & strata To match the taxa and strata indicated in the vegetation table the following has be indicated first:
- the column # that holds the taxon names;
- the column # that holds the strata. Leave 0 if there is no column with information on strata;
- the row # with the first species name.
If there is no match the species names and strata are marked with red colour. The mismatching names can be replaced by using the drop-down lists (see How to search for species names). Species that cannot be matched will not get lost, but will be stored as original taxon concept. The original concept will also be stored for those taxa that have been matched manually.
2.Match cover values To match the cover values present in the vegetation table the following has to be indicated first:
- the column # that holds the first plot;
- the column # that holds the last plot;
- the cover scale to which the cover values present in the vegetation table need to be matched. Select the appropriate cover scale from the drop-down list. Use the drop-down list to select a legitimate code if there is no match. Unlike with taxon names and strata non-matching cover values are obligated to be mapped.
- If sociability values are included in the data (as shown in the screen shot below) the option Cover values with sociability values (1-5) needs to be checked. Turboveg will then automatically separate cover and sociability values and stores both values in the database. Only sociability values 1,2,3,4 or 5 are excepted. Other values are ignored. In the dataset the sociability values will be shown next to cover values.
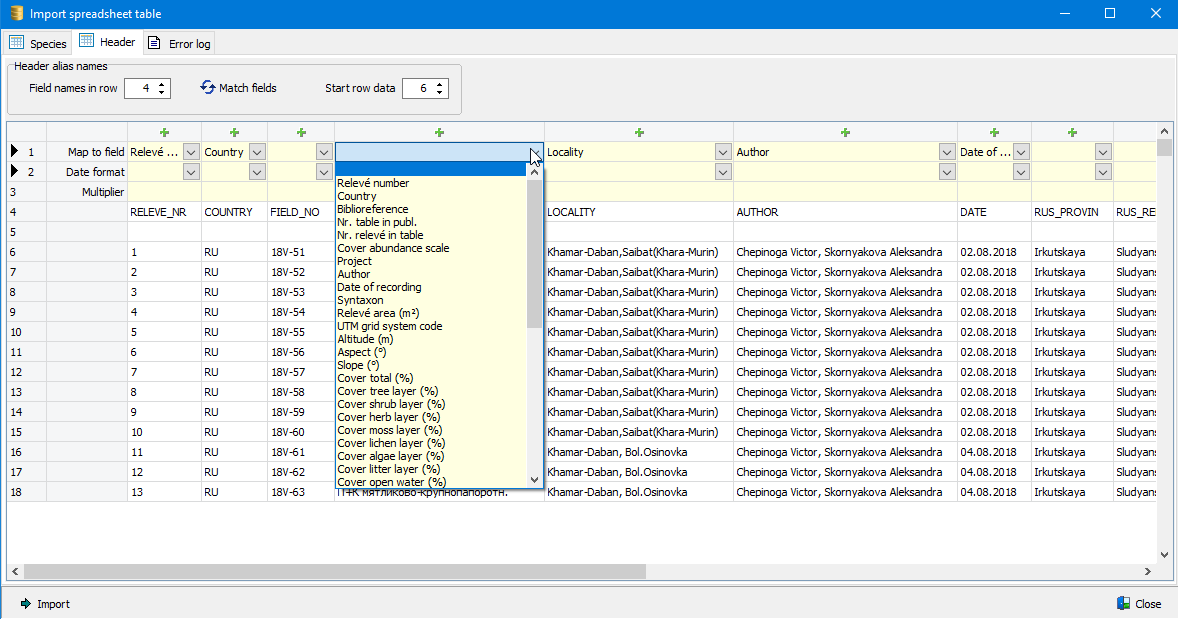
3. Grab header To grab the header data, first indicate which column # holds the descriptions/names.
Manual mapped unrecognised taxon names are stored in a database table, allowing subsequent imports to automatically map unrecognised taxon names. These taxon names are indicated with green colour.
Note that species that cannot be matched will also be imported, but will end up in the database as 'original concept'. These species are not searchable. In the case a species name in the vegetation table is part of a name in the taxon database, or the other way around, the matching taxon name will be preceded by a tilde (~).
Header data are automatically transposed and placed on a separate tab. Here the matching of header descriptions can be done with available field definitions in the database. Note that in the vegetation tables field descriptions can be replaced by Turboveg2 field names to ease the matching (e.g. 'RELEVE_NR' instead of 'Relevé number'). After having set the row # in which the field names are located, the matching can be performed. If there is no match with an existing field in the database, a manual mapping can be done by selecting the appropriate field description from the drop-down list. In case there is no equivalent in the database, a new field can be defined by clicking the header indicated with '+'.
Note that for date fields the date format has to be selected, and in case of numerical values a multiplier can be defined. For example, if the relevé area is defined in dm2 the multiplier should be defined as 0.01 in order to convert the area to m2 if that is the unit in which surface areas are stored in the database.
Also note that the geographic precision of a plot cannot be mapped to a header data field. Instead Turboveg will automatically process the values if the field name is define as 'PRECISION', 'UNCERTAINTY' or 'Location uncertainty (m)'.
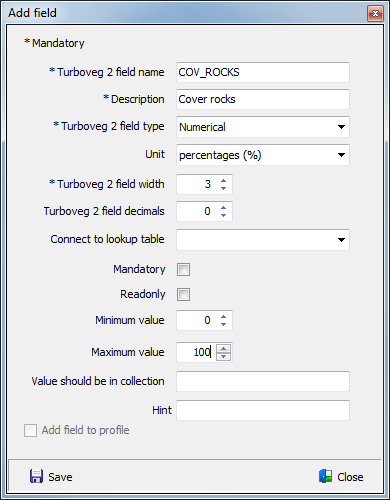
To add a new field the following parameters have to be defined (see screen shot below):
Field name: To stay compatible with Turboveg2 a maximum of 10 characters can be entered. Only the characters 'A' to 'Z' and '_' are allowed.
Description: Enter a meaningful description for the field.
Field type: To stay compatible with Turboveg2, only the 'Numerical, Alphanumerical' and 'Logical' (Yes/No) data types can be selected.
Unit: If applicable, select a unit from the drop-down list.
Field width/decimals: Again, to stay compatible with Turboveg2, the width of the field and number of decimals needs to be defined. The width is determined by the largest entry. In case of a numerical value with decimals, always count the decimal point as well. Thus value 6.35 has a width of 4 and has two decimals.
Selecting a unit is not mandatory since the unit required may not be present in the drop-down list. Management of units and fields can be done in the management sections afterwards.
Check Add field to profile if the new column needs be to visible when browsing the dataset
Import
During import data from columns assigned to a lookup tables (e.g. author names) will be added to these tables automatically. Confirmation though is needed for each unique value to avoid getting a messy database.
Boolean fields (yes/no)
Dealing with boolean fields the following values are accepted:
•For Yes: 'y', 'Y', 'q', 'Q', 'j', 'J', '1', or '-1'.
•For No: 'n', 'N', or '0'.
•Unknown: any other character (e.g. 'x', '-'), except a blank.
Error log tab
If any error occurs during import the error message will be listed on the third tab. Errors may occur if for example dates are invalid, or if cover values of vegetation layers are outside the range of 0 to 100%. The error log can be saved to a text file.